background

Thursday, August 28, 2025

How to Make Your Own Amigurumi Sticks

If you are a crocheter of amigurumi, you have probably heard of these sticks. If you haven't, Amigurumi sticks, sometimes called sewing sticks or assembly sticks, are a handy tool crocheters use to keep arms, legs, and heads in place while sewing them onto stuffed animals or dolls. They save time, reduce frustration, and help you get perfectly placed pieces every time.


I had seen several people on Instagram using them, but when I checked out the maker's sale pages, I realized I really couldn't afford them. After looking them over, I realized I could probably make these. So I gave it a try and found out just how easy it is to make your own amigurumi sticks!

Supplies Needed

  • knitting needles
  • silicone beads
  • strong adhesive glue (I used E6000)
  • baby wipes
  • marker
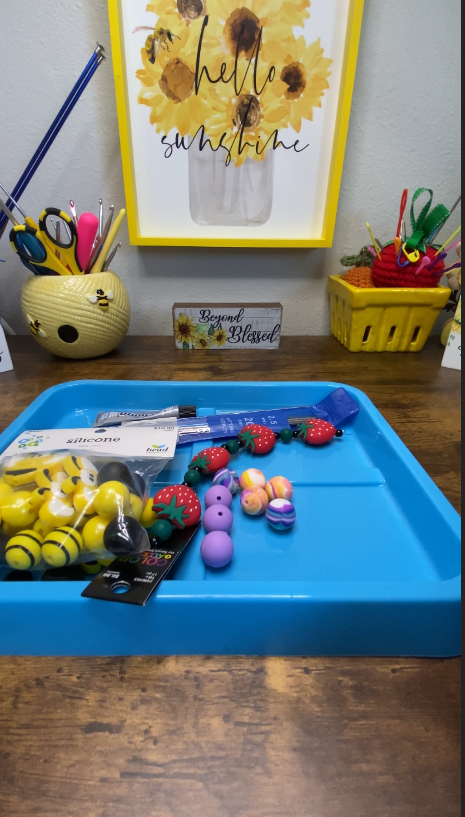
  • optional: a tray to hold the beads

Knitting Needles

You will need knitting needles that are small enough to fit into the beads. I got 2.75mm needles (double point) that are 20cm long. These make shorter sticks, but most of my projects are on the smaller size. I bought my knitting needles off of Aliexpress last year before the tariffs. They were very cheap for a package of 5 (under $2!) A friend of mine uses 3.5mm and they worked well for her. Just be careful if you order them online. Pay attention to the length. I bought some off of Walmart and when I picked them up, they are soooo long!!! Ooopsie!!

Silicone Beads

I like to use silicone because they "give". That way they can stretch a bit to fit over your needles. I bought a package off of Aliexpress that had a mixture of bees and yellow and black beads that included spacer beads and hexagons. I loved that variety. I had to buy some recently to make some for a giveaway and found a similar bee kit at Hobby Lobby, but it only had the large bees and round beads. AND, they were a lot more expensive even on sale. I have also found silicone beads at the Dollar Tree. Another option is looking in the jewelry section at your local craft store. I found some really cute strawberry silicone beads in the bracelet kit section that were threaded onto a wire with other beads.

Strong Adhesive

To hold the beads onto your needles, you will need a strong adhesive. I prefer to use E6000. If you don't use this glue very often, I suggest buying a package of smaller tubes so it won't dry out.

Other supplies

You will want some baby wipes handy for ooopsies! I had to wipe glue a few times. The marker is to mark your needle. Also handy is a small tray for the beads to keep them from rolling away. I found mine at the Dollar Tree!

How to make your own amigurumi sticks

This is so easy, it might be a crime.


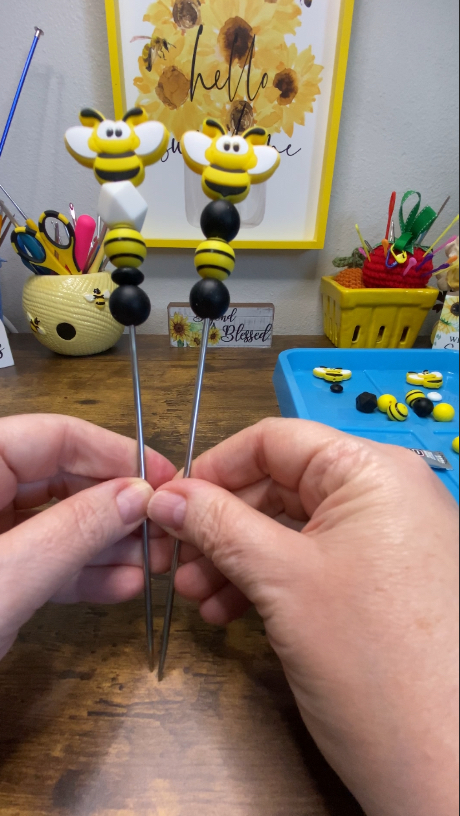
  1. Decide how you want your beads to look on your needle. Put your focal bead on top and then taper down. Make sure not to put too many... you want plenty of room on your stick to insert into your amigurumi to hold it in place.
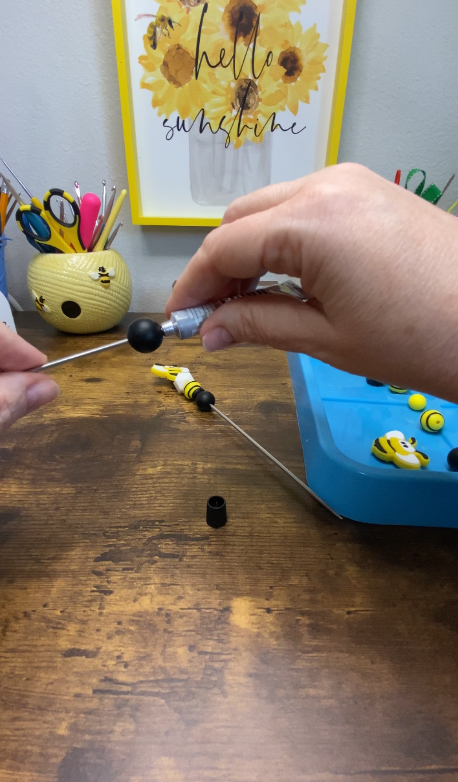
  2. Once you have your beads on your needle, you will need to mark your needle under the last bead. To do this, hold your fingernail right under that last bead and then push your beads up a bit. Use the marker to mark the needle right above your fingernail.
  3. Next, remove all the beads from that needle. Grab your tube of glue and insert your needle into it to the mark. Twist the needle in the glue tube to coat it well and remove. Insert that last bead over the top and push it down to just cover the mark. If you squish a lot of glue down, either wipe it away, or try to get a lot of it onto the next bead. You will then repeat this step with each bead, making sure to insert the needle into the glue tube each time. On your last bead (the focal bead), make sure it covers the tip of your needle! If not, just push your beads up a bit so that the needle gets covered. You don't want the tip of that needle to poke you when you use your sticks!
  4. Lastly, just set them aside and let them dry completely. I usually let mine dry overnight.


That's it!

Now you know how easy it is to make your own amigurumi sticks! Not only are they budget-friendly, but you can customize them with beads that match your personality or project theme. If you make some, I’d love to see—tag me on Instagram @thewhimzb so I can share your creations!


Click here for free crochet patterns!


Friday, August 15, 2025

Free Crochet Pattern: Half-Pint Tri-Colored Pumpkin (Candy Corn-Inspired Fall Décor)


Fall is almost here, and it’s the perfect time to whip up a quick and charming crochet project! Meet Half-Pint — a sweet little tri-colored pumpkin that’s as fun to make as it is to display. This beginner-friendly pattern works up fast and can be customized in any colors you like, but my favorite version is inspired by candy corn for a festive Halloween twist. Whether you’re decorating your mantel, sprucing up your tiered tray, or making a batch for gifts and craft fairs, this free crochet pumpkin pattern will add a touch of handmade cozy charm to your autumn décor.


small striped crocheted pumpkin
This Half-Pint was crocheted using acrylic yarn.

Let's get started

This free pumpkin crochet pattern is written for beginner crocheters. It is a simple stitch and color repeat. The 3 yarn colors will be in the same order throughout the pattern. You will carry your yarn colors and the next one you need will be ready for you at the end of every row. Use the Yarn-Under/Yarn-Over method to minimize the holes between stitches.

  • Make the color changes by pulling through the new color in the last yarn over of the last stitch of each row.
  • The stitch marker is a visual to let you know you are working the HDC side.
  • The HDC side is the "right" side of your panel. On the "right" side of your panel
  • the HDC rows will be behind your raised rows of SC. These raised rows create "ridges" in the pumpkin, giving it a nice texture.
  • Be sure to count your stitches every few rows to make sure your panel doesn't wind up distorted.
  • If making a candy corn pumpkin: use Yellow, Orange, & White -in that order.

Supplies

  • Yarn: #4 or #5 weight or any thin chenille or velvet in 3 colors (noted as Yarn A, B, & C in pattern)
  • If using chenille or velvet, you will need a small amount of cotton or acrylic to sew with
  • Hook: 4 mm
  • Stuffing
  • Long yarn needle and short yarn needle
  • Scissors
  • Locking Stitch Marker
pumpkin crocheted using Dollar Tree yarn
This pumpkin was crocheted using Just Chenille yarn by Premier.
It's from the Dollar Tree.

Terms

  • BLO: back loop only
  • CH: chain
  • FO: fasten off
  • HDC: half double crochet
  • R: row(s)
  • SC: single crochet
  • ST(S): stitch(es)

The pattern

  • R1: With Yarn A, make a slip knot and ch 21. Starting in the second ch from hook: HDC across in the BLO (20)
  • Place the stitch marker in the front of one of those HDCs. This is a visual reminder that when you turn to this side, you will be making a row of HDC.
  • R2: Bring up Yarn B, Ch1, turn. SC across in the BLO (20)
  • R3: Bring up Yarn C, Ch1, turn. HDC across in the BLO (20)
  • R4: Bring up Yarn A, Ch1, turn. SC across in the BLO (20)
  • The pattern is a row of HDC, followed by a row of SC.
  • Change colors every row. The next color you need will always be ready for you at the end of the row!
  • Follow the color repeat 12Xs for a total of 36 rows, ending with a SC row in Yarn C.
  • FO and cut a tail to sew up the seam. Weave in all other ends on the backside of the panel.

Sew up the Side Seam

  • With the right side out (the side with the stitch marker), fold your panel in half with the short ends together.
  • Using your SHORT yarn needle, whip stitch together by going through the front loops of the HDC row (where your stitch marker is) and the back loops of the SC row on the opposite side.
  • This creates the last SC ridge and a seamless look.
    • When you come to the end, tie a knot and…
      If using worsted weight yarn: cut a long tail to gather
      the bottom.
      If using chenille or velvet yarn: trim. Weave in tail.

Gather the Bottom

  • Turn your pumpkin inside out.
  • If using plush yarn, use a length of cotton or acrylic to sew with to avoid breakage as you will be pulling tightly.
  • Now thread the tail or new yarn through your LONG yarn needle. You will want to knot the new yarn.
  • Run it through the top stitches of the SC row ridges.
  • Pull tight to close. If it doesn't close all the way, pull as tight as you can. Hold it in place, then use your threaded needle to go around the hole again. Pull tight. If it is still not closed, make some cross stitches.
  • Tie in a knot to FO.
  • Turn right-side out.

Gather the Top

  • Cut a new length of yarn and tie it in a knot to the inside of the top sts.
  • Gather the top by running your long needle through the tops of your SC ridges.
  • Stuff the pumpkin as you go. Be careful not to stuff too full, since this is a “flat” pumpkin.
  • Add more stuffing through the top if needed.
  • After stuffing the pumpkin, you may need to close the hole a bit more.
  • If needed: use the same method as mentioned above for the bottom. Tie off, but do not cut yarn.

Flatten the Pumpkin

  • Keeping your yarn in the long needle, go through the pumpkin and come out the bottom.
  • Move over 1 stitch and go back up through the pumpkin.
  • Pull tight to "flatten" the pumpkin.
  • Repeat once more to secure and FO.
  • Hide end inside pumpkin.

Stem

  • With any yarn color, Ch21.
  • Make 2 SC rows of 20.
  • Fold stem together and SC along the end.
  • FO and leave a long tail to sew into the hole at the top of the pumpkin.
  • Secure by sewing through to the bottom and back up to the top like you did to flatten your pumpkin.

Curly Tendrils (optional)

  • Make one or two.
  • With any yarn color, Ch21.
  • Starting in 2nd ch from hook, SC across (20)
  • Tie end with beginning tail. Use a yarn needle to sew to the base of the stem.
  • Hide ends inside pumpkin.
small crocheted candy corn pumpkin
candy corn pumpkins free crochet pattern

I hope you enjoy making your own Half-Pint tri-colored pumpkin as much as I enjoyed designing it! With its quick stitches, easy assembly, and endless color possibilities, this free crochet pattern is perfect for adding a splash of seasonal charm to your home. Whether you go for the classic candy corn look, traditional autumn tones, or something whimsical and bright, this little pumpkin will bring a handmade touch to your fall, Halloween, and Thanksgiving décor. Don’t forget to share your creations — I’d love to see your Half-Pints bringing cozy vibes to the season!

Click here for more candy corn crochet projects.

For more pumpkin patterns Click here .

Click here for all things Fall!

How to Make Your Own Amigurumi Sticks

If you are a crocheter of amigurumi, you have probably heard of these sticks. If you haven't, Amigurumi sticks, sometimes called sewing...