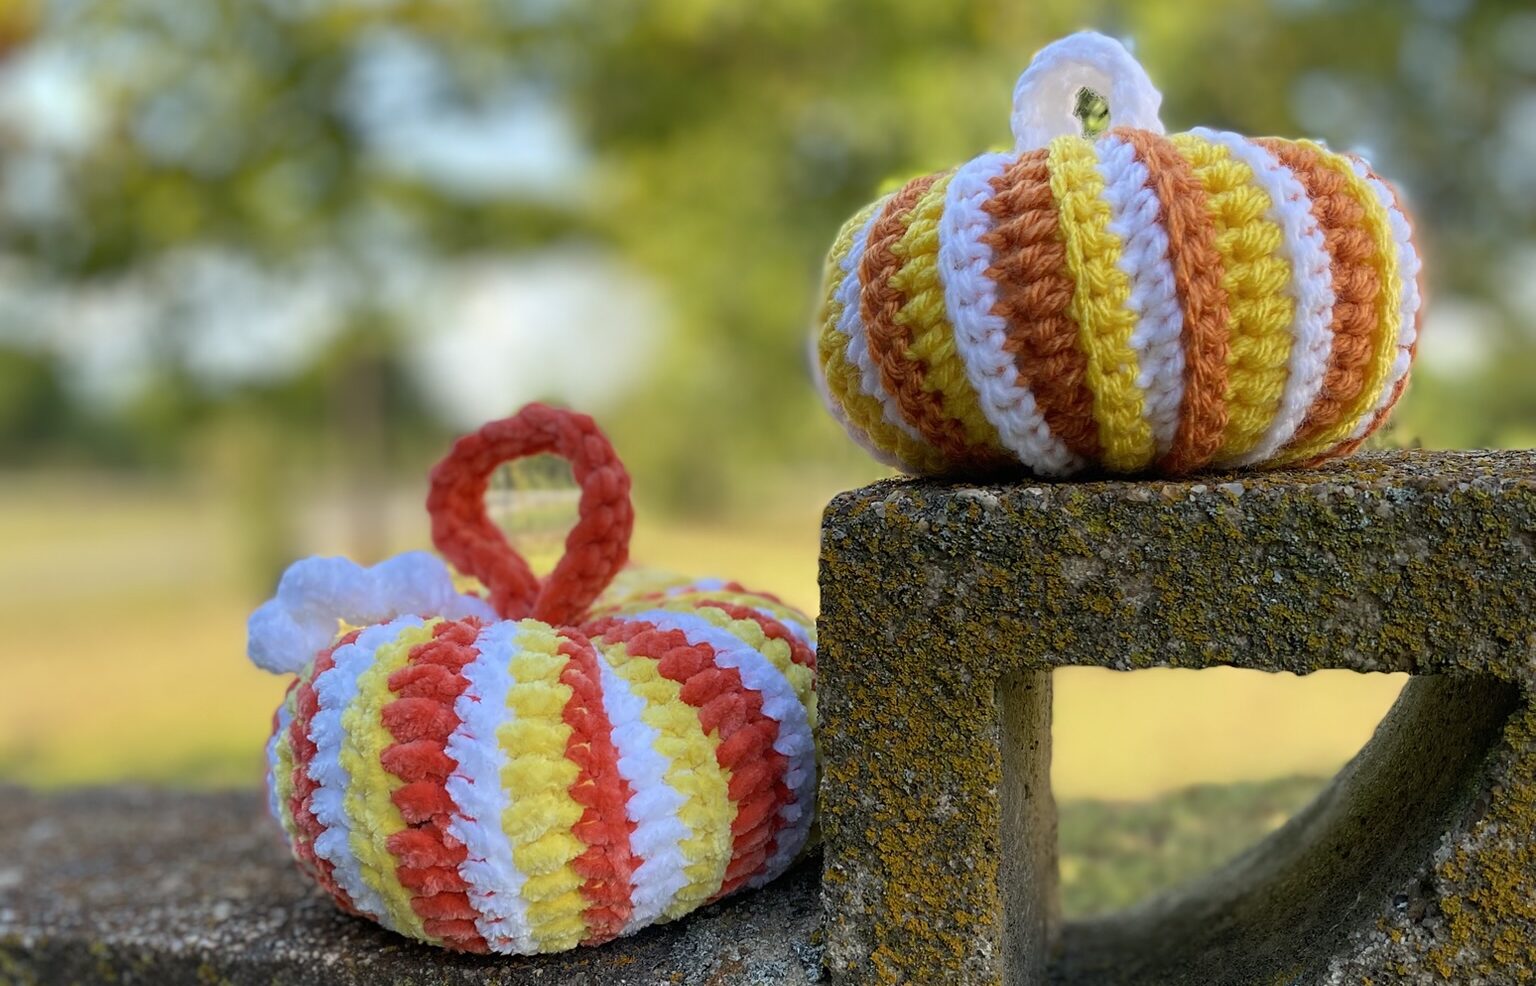
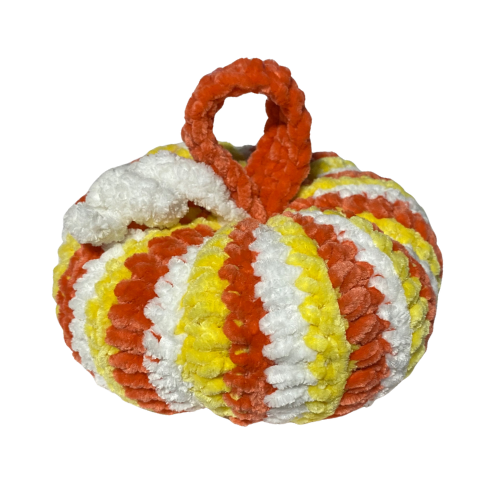
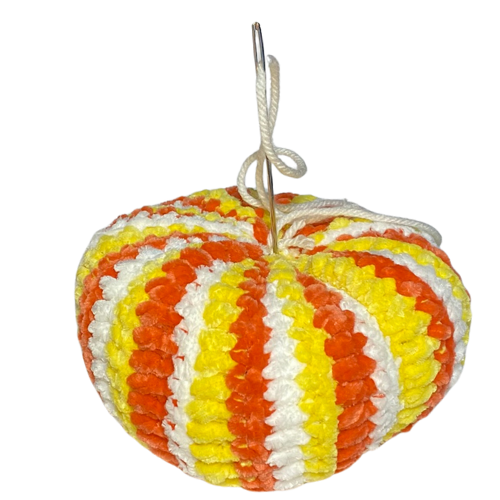
Free Crochet Pattern: Half-Pint Tri-Colored Pumpkin (Candy Corn-Inspired Fall Décor)
Fall is almost here, and it’s the perfect time to whip up a quick and charming crochet project! Meet Half-Pint — a sweet little tri-colored pumpkin that’s as fun to make as it is to display. This beginner-friendly pattern works up fast and can be customized in any colors you like, but my favorite version is inspired by candy corn for a festive Halloween twist. Whether you’re decorating your mantel, sprucing up your tiered tray, or making a batch for gifts and craft fairs, this free crochet pumpkin pattern will add a touch of handmade cozy charm to your autumn décor.

Let’s get started
This free pumpkin crochet pattern is written for beginner crocheters. It is a simple stitch and color repeat. The 3 yarn colors will be in the same order throughout the pattern. You will carry your yarn colors and the next one you need will be ready for you at the end of every row. Use the Yarn-Under/Yarn-Over method to minimize the holes between stitches.
- Make the color changes by pulling through the new color in the last yarn over of the last stitch of each row.
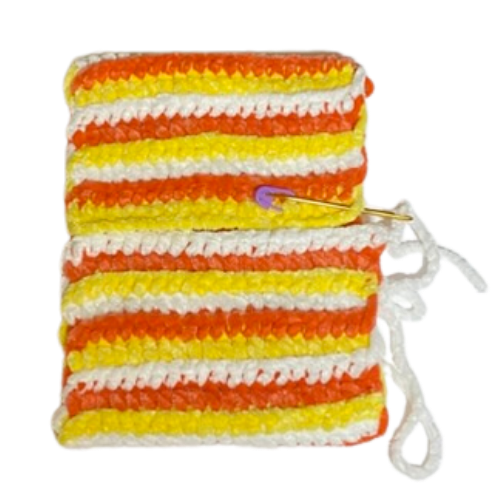
- The stitch marker is a visual to let you know you are working the HDC side.
- The HDC side is the “right” side of your panel. On the “right” side of your panel
- the HDC rows will be behind your raised rows of SC. These raised rows create “ridges” in the pumpkin, giving it a nice texture.
- Be sure to count your stitches every few rows to make sure your panel doesn’t wind up distorted.
- If making a candy corn pumpkin: use Yellow, Orange, & White -in that order.
Supplies
- Yarn: #4 or #5 weight or any thin chenille or velvet in 3 colors (noted as Yarn A, B, & C in pattern)
- If using chenille or velvet, you will need a small amount of cotton or acrylic to sew with
- Hook: 4 mm
- Stuffing
- Long yarn needle and short yarn needle
- Scissors
- Locking Stitch Marker
It’s from the Dollar Tree.
Terms
- BLO: back loop only
- CH: chain
- FO: fasten off
- HDC: half double crochet
- R: row(s)
- SC: single crochet
- ST(S): stitch(es)
The pattern
- R1: With Yarn A, make a slip knot and ch 21. Starting in the second ch from hook: HDC across in the BLO (20)
- Place the stitch marker in the front of one of those HDCs. This is a visual reminder that when you turn to this side, you will be making a row of HDC.
- R2: Bring up Yarn B, Ch1, turn. SC across in the BLO (20)
- R3: Bring up Yarn C, Ch1, turn. HDC across in the BLO (20)
- R4: Bring up Yarn A, Ch1, turn. SC across in the BLO (20)
- The pattern is a row of HDC, followed by a row of SC.
- Change colors every row. The next color you need will always be ready for you at the end of the row!
- Follow the color repeat 12Xs for a total of 36 rows, ending with a SC row in Yarn C.
- FO and cut a tail to sew up the seam. Weave in all other ends on the backside of the panel.

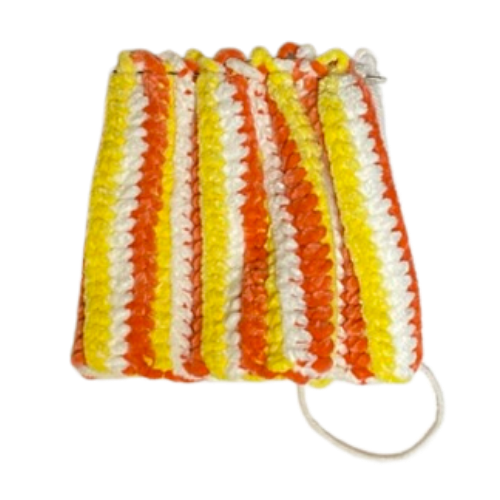
Sew up the Side Seam
- With the right side out (the side with the stitch marker), fold your panel in half with the short ends together.
- Using your SHORT yarn needle, whip stitch together by going through the front loops of the HDC row (where your stitch marker is) and the back loops of the SC row on the opposite side.
- This creates the last SC ridge and a seamless look.
- When you come to the end, tie a knot and…
If using worsted weight yarn: cut a long tail to gather
the bottom.
If using chenille or velvet yarn: trim. Weave in tail.
- When you come to the end, tie a knot and…
Gather the Bottom
- Turn your pumpkin inside out.
- If using plush yarn, use a length of cotton or acrylic to sew with to avoid breakage as you will be pulling tightly.
- Now thread the tail or new yarn through your LONG yarn needle. You will want to knot the new yarn.
- Run it through the top stitches of the SC row ridges.
- Pull tight to close. If it doesn’t close all the way, pull as tight as you can. Hold it in place, then use your threaded needle to go around the hole again. Pull tight. If it is still not closed, make some cross stitches.
- Tie in a knot to FO.
- Turn right-side out.
Gather the Top
- Cut a new length of yarn and tie it in a knot to the inside of the top sts.
- Gather the top by running your long needle through the tops of your SC ridges.
- Stuff the pumpkin as you go. Be careful not to stuff too full, since this is a “flat” pumpkin.
- Add more stuffing through the top if needed.
- After stuffing the pumpkin, you may need to close the hole a bit more.
- If needed: use the same method as mentioned above for the bottom. Tie off, but do not cut yarn.
Flatten the Pumpkin
- Keeping your yarn in the long needle, go through the pumpkin and come out the bottom.
- Move over 1 stitch and go back up through the pumpkin.
- Pull tight to “flatten” the pumpkin.
- Repeat once more to secure and FO.
- Hide end inside pumpkin.
Stem
- With any yarn color, Ch21.
- Make 2 SC rows of 20.
- Fold stem together and SC along the end.
- FO and leave a long tail to sew into the hole at the top of the pumpkin.
- Secure by sewing through to the bottom and back up to the top like you did to flatten your pumpkin.
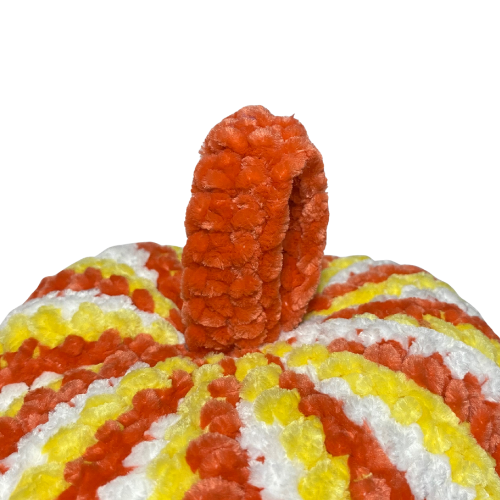
Curly Tendrils (optional)
- Make one or two.
- With any yarn color, Ch21.
- Starting in 2nd ch from hook, SC across (20)
- Tie end with beginning tail. Use a yarn needle to sew to the base of the stem.
- Hide ends inside pumpkin.

I hope you enjoy making your own Half-Pint tri-colored pumpkin as much as I enjoyed designing it! With its quick stitches, easy assembly, and endless color possibilities, this free crochet pattern is perfect for adding a splash of seasonal charm to your home. Whether you go for the classic candy corn look, traditional autumn tones, or something whimsical and bright, this little pumpkin will bring a handmade touch to your fall, Halloween, and Thanksgiving décor. Don’t forget to share your creations — I’d love to see your Half-Pints bringing cozy vibes to the season!
Click here for more candy corn crochet projects.
For more pumpkin patterns Click here .
Click here for all things Fall!